

前回の記事、Amazon S3 Vectors (1) : マネージメントコンソールでナレッジの作成と検索テストの実行では新しく出たAmazon S3 Vectors を活用してAmazon Bedrockのナレッジストアとして登録を行い、検索のデモを行いました。
https://serverless.co.jp/blog/g2oa60nfvp/
今日は続きでPythonスクリプトからS3 Vectorsを操作していきます。
に手順がありますが、少し公式ドキュメントは解説が不足しているようですので、補足しながら作業を進めていきます。
さっそくやってみる
1.環境整備
まずはboto3の環境を整えます。
# Python 仮想環境を作成(例: venv というディレクトリ)
python3 -m venv venv

# 仮想環境を有効化
source venv/bin/activate

# boto3 をインストール
pip install boto3

# スクリプトを実行
python test.py次にAWS CLIをインストールします。
curl "https://awscli.amazonaws.com/awscli-exe-linux-x86_64.zip" -o "awscliv2.zip"
unzip awscliv2.zip
sudo ./aws/install
2. IAM の準備
AWSの公式ドキュメントにはPythonスクリプトはあるものの、動作に必要なIAMユーザーの権限が記載されていませんでした。
必要な権限は以下です。
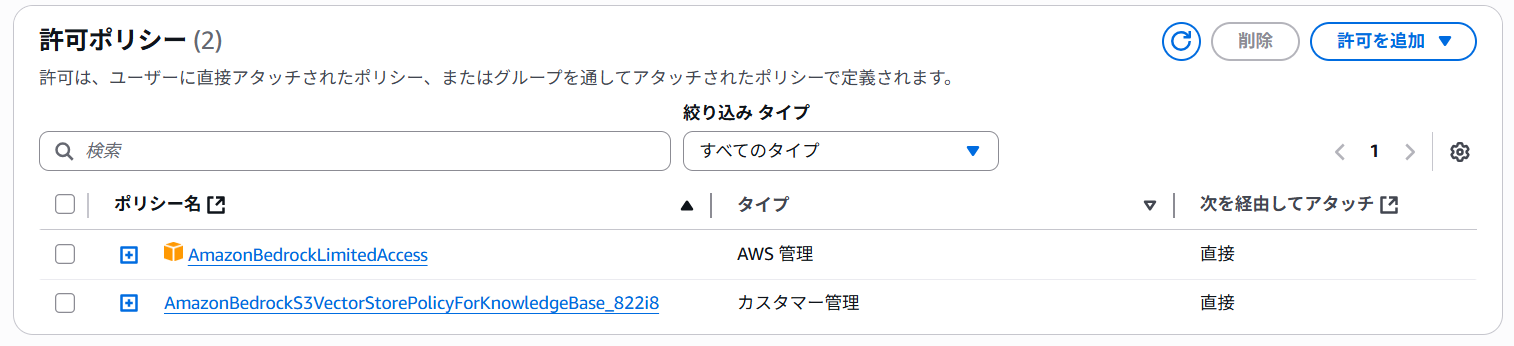
2つ目のカスタムポリシーは前回の記事の内容を実行すれば自動で作成されていまので、それを指定します。内容は以下の様になっています。
{
    "Version": "2012-10-17",
    "Statement": [
        {
            "Sid": "S3VectorsPermissions",
            "Effect": "Allow",
            "Action": [
                "s3vectors:GetIndex",
                "s3vectors:QueryVectors",
                "s3vectors:PutVectors",
                "s3vectors:GetVectors",
                "s3vectors:DeleteVectors"
            ],
            "Resource": "arn:aws:s3vectors:us-east-1:917561075114:bucket/vectorbucket/index/vectorindex",
            "Condition": {
                "StringEquals": {
                    "aws:ResourceAccount": "917561075114"
                }
            }
        }
    ]
}
記事執筆時点(2025年7月26日)ではS3 Vectors用マネージドポリシーが存在しないため、個別にActionを指定する必要があります。汎用S3バケットへのポリシーは不要です。
IAMユーザーができたらaws configure でクレデンシャルをセットしておきます。
3. テスト用データの書き込み
以下のファイルを put.py の名前で作成します。
# Populate a vector index with embeddings from Amazon Titan Text Embeddings V2.
import boto3
import json

# Create Bedrock Runtime and S3 Vectors clients in the AWS Region of your choice.
bedrock = boto3.client("bedrock-runtime", region_name="us-east-1")
s3vectors = boto3.client("s3vectors", region_name="us-east-1")

# Texts to convert to embeddings.
texts = [
    "Star Wars: A farm boy joins rebels to fight an evil empire in space",
    "Jurassic Park: Scientists create dinosaurs in a theme park that goes wrong",
    "Finding Nemo: A father fish searches the ocean to find his lost son"
]

# Generate vector embeddings.
embeddings = []
for text in texts:
    response = bedrock.invoke_model(
        modelId="amazon.titan-embed-text-v2:0",
        body=json.dumps({"inputText": text})
    )

    # Extract embedding from response.
    response_body = json.loads(response["body"].read())
    embeddings.append(response_body["embedding"])

# Write embeddings into vector index with metadata.
s3vectors.put_vectors(
    vectorBucketName="vectorbucket",
    indexName="vectorindex",
    vectors=[
        {
            "key": "Star Wars",
            "data": {"float32": embeddings[0]},
            "metadata": {"source_text": texts[0], "genre":"scifi"}
        },
        {
            "key": "Jurassic Park",
            "data": {"float32": embeddings[1]},
            "metadata": {"source_text": texts[1], "genre":"scifi"}
        },
        {
            "key": "Finding Nemo",
            "data": {"float32": embeddings[2]},
            "metadata": {"source_text": texts[2], "genre":"family"}
        }
    ]
)
リージョン、バケット名、インデックス名は適宜書き換えておきます。この例では、3つの映画情報を以下の形式で書き込んでいます。
key : 映画の名前
data: amazon.titan-embed-text-v2:0によりベクトル化された数値
metadata : 映画の簡単な説明とジャンル
dataには映画の名前だけではなく映画の簡単な説明も含んでベクトル化されています。
python put.py で書き込みを実行します。
4. データのクエリ
次に以下の内容でget.pyを作成します。(公式サンプルより少し短くしています)
# Query a vector index with an embedding from Amazon Titan Text Embeddings V2.
import boto3
import json

# Create Bedrock Runtime and S3 Vectors clients in the AWS Region of your choice.
bedrock = boto3.client("bedrock-runtime", region_name="us-east-1")
s3vectors = boto3.client("s3vectors", region_name="us-east-1")

# Query text to convert to an embedding.
input_text = "universe"

# Generate the vector embedding.
response = bedrock.invoke_model(
    modelId="amazon.titan-embed-text-v2:0",
    body=json.dumps({"inputText": input_text})
)

# Extract embedding from response.
model_response = json.loads(response["body"].read())
embedding = model_response["embedding"]

# Query vector index.
response = s3vectors.query_vectors(
    vectorBucketName="vectorbucket",
    indexName="vectorindex",
    queryVector={"float32": embedding},
    topK=1,
    returnDistance=True,
    returnMetadata=True
)
print(json.dumps(response["vectors"], indent=2))
python get.py を実行すると以下が出力されるはずです。
[
  {
    "key": "Star Wars",
    "metadata": {
      "genre": "scifi",
      "source_text": "Star Wars: A farm boy joins rebels to fight an evil empire in space"
    },
    "distance": 0.8466539978981018
  }
]実行するとまず、input_text = "universe" で指定されているuniverseがベクトル化されます。その後ベクトルデータで3つの映画に対して検索を行います。文字列検索ではなく生成AIのベクトル化により意味の検索が行われuniverse(宇宙)に一番近いStart Warsが出力されます。
topK=1を3にすると近しい結果上位3つが表示され以下の様になります。
[
  {
    "key": "Star Wars",
    "metadata": {
      "source_text": "Star Wars: A farm boy joins rebels to fight an evil empire in space",
      "genre": "scifi"
    },
    "distance": 0.8698573112487793
  },
  {
    "key": "Jurassic Park",
    "metadata": {
      "genre": "scifi",
      "source_text": "Jurassic Park: Scientists create dinosaurs in a theme park that goes wrong"
    },
    "distance": 0.8969135880470276
  }
]
distanceの値が小さいほど類似性が高いことを意味します。データは3つ書き込んでいるはずですが、2つしか返ってきていません。S3 Vectorsは現在Previewでありあまり関係性の薄いベクトルデータは結果が戻ってこないようです。おそらく負荷の関係上内部で遠いところにあるベクトルは足切りをしているのかもしれません。
通常ベクトルストアでは検索結果の範囲を指定するdistance threshold(スコアしきい値)が用意されています。これにより指定された値以上に距離が離れているデータは検索結果に入らないような制御が可能です。S3 Vectorsでは現時点ではこのパラメータが公開されていないようです。